
Q: How do I add additional components to my DellEMC Vision Intelligent Operations instance?
A: This guide can be used pretty much for adding any additional devices to Vision as the majority of the procedure is the same. The main changes will be in the detail of the device type. In this example, I have used Vplex which I am adding to a VB350
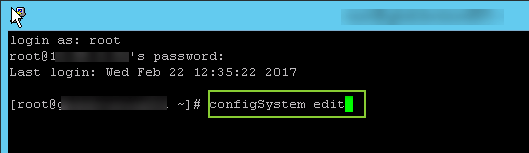
Step 1: Login into the Vision Core Appliance (also know as Slib – System Libary) either from the Console of the VM or ssh to the host with your root creds and run
configSystem edit
Step 2: This will open a ‘GUI’ that will detail all the components that are currently configured on the system – It reads the config from this file /opt/vce/fm/conf/systems.profile. Click next to cycle through and view each device. You can also use this wizard to change the passwords or update the connection details that Vision uses to connect to each device. As we want to add a new component we click add.

Step 3: From the add components wizard select the appropriate device.

Step 4: Fill in the Type, Component tag, IP address, Method, username, and password as below and save your configuration.
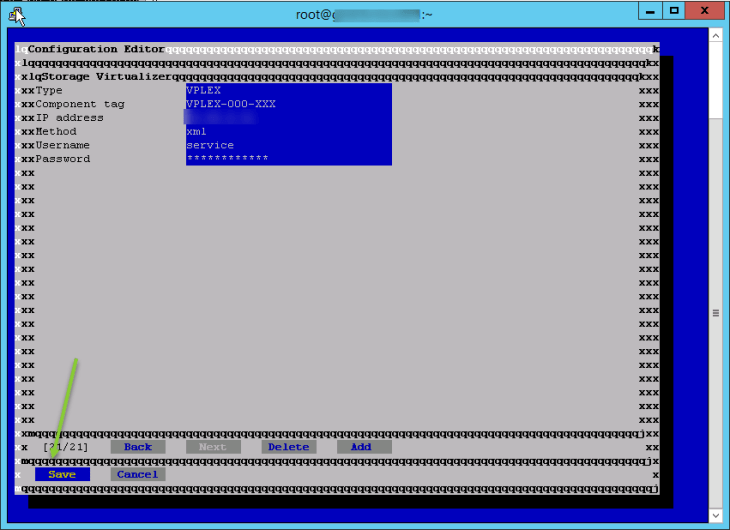
Step 5: When you save the new device setting all the changes will be listed for you to review. Click Yes.

Step 6: All component details will automatically be validated and connection to each device confirmed. Once no errors have flagged the systems.profile file will be updated. I have highlighted were the Vplex validation has succeeded.

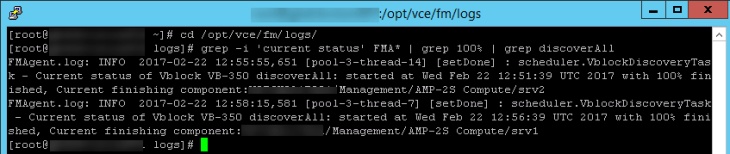
Step 7: To trigger a rediscovery you will need to stop and start the FMagent.
stopFMagent
startFMagent

Step 8: Check that discovery has completed 100%. In order to do this, you will need to run
cd /opt/vce/fm/logs/
grep -i 'current status' FMA* | grep 100% | grep discoverAll
Step 9: Is to confirm that the Vplex has been added successfully the XML File which holds all the component details such as serial number, operation status etc. To access this file browse to this URL (for VxBlock and VxRack) https://hostname:8443/fm/systems and for Vblocks the URL is https://hostname:8443/fm/vblocks
Log in using the CAS authentication user account and password

Step 10: Scroll down the storage section of the XML File and we can see the Vplex Storage virtualizer has been added.
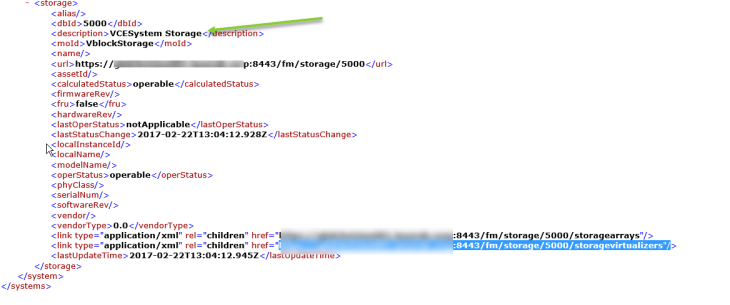
Step 11: Copy and paste the URL highlighted in blue the previous graphic to display extra details on the Vplex Array. Code version, operational status can etc can be seen here

Step 12: We want to ensure that Vplex details will show up in the Vision MSM GUI. I have attached both Graphics so you can see the before and after shot. Note MSM Polls with the Core VM ever 15 minutes so you might have to wait to see the changes reflected.


great guide! thanks mate!
LikeLiked by 1 person
Tip top instructions, excellent guide.
LikeLiked by 1 person