
With the introduction of vSphere6.5 VMware have given us a much more simplified approach to installing vCenter via command line. All the prerequisites still apply here you need a functioning DNS server with PTR and A record created etc.
Everything you need is contained in the
CD-ROM drive:\vcsa-cli-installer\templates\install folder.
Within this folder are eight .JSON files that are perfect templates for configuring what ever flavor of vCenter you wish. I’m going to install a vCenter with two external PSC’s
For this, I am going to use
- PSC_first_instance_on_ESXi.json
- PSC_replication_on_ESXi.json
- vCSA_on_ESXi.json

Note all the syntax variables can be found within the VMware Documentation portal
Firstly we will create the .JSON file to deploy the Primary PSC, Create the Domain and the SSO Site.
psc01.JSON file
{
 "__version": "2.3.0",
 "__comments": "Sample template to deploy a Platform Services Controller appliance as the first instance in a new vCenter Single Sign-On domain on an ESXi host.",
 "new.vcsa": {
 "esxi": {
 "hostname": "192.168.105.12",
 "username": "root",
 "password": "pass1234!",
 "deployment.network": "vspheremgmt",
 "datastore": "MGMT-DS-01"
 },
 "appliance": {
 "thin.disk.mode": true,
 "deployment.option": "infrastructure",
 "name": "psc01.cliffcahill.com"
 },
 "network": {
 "ip.family": "ipv4",
 "mode": "static",
 "ip": "192.168.105.211",
 "dns.servers": [
 "192.168.99.10"
 ],
 "prefix": "24",
 "gateway": "192.168.105.1",
 "system.name": "psc01.cliffcahill.com"
 },
 "os": {
 "password": "Pass1234!",
 "ssh.enable": false
 },
 "sso": {
 "password": "Pass1234!",
 "domain-name": "vsphere.local",
 "site-name": "SSO01"
 }
 },
 "ceip": {
 "description": {
 "__comments": [
 "++++VMware Customer Experience Improvement Program (CEIP)++++",
 "VMware's Customer Experience Improvement Program (CEIP) ",
 "provides VMware with information that enables VMware to ",
 "improve its products and services, to fix problems, ",
 "and to advise you on how best to deploy and use our ",
 "products. As part of CEIP, VMware collects technical ",
 "information about your organization's use of VMware ",
 "products and services on a regular basis in association ",
 "with your organization's VMware license key(s). This ",
 "information does not personally identify any individual. ",
 "",
 "Additional information regarding the data collected ",
 "through CEIP and the purposes for which it is used by ",
 "VMware is set forth in the Trust & Assurance Center at ",
 "http://www.vmware.com/trustvmware/ceip.html . If you ",
 "prefer not to participate in VMware's CEIP for this ",
 "product, you should disable CEIP by setting ",
 "'ceip.enabled': false. You may join or leave VMware's ",
 "CEIP for this product at any time. Please confirm your ",
 "acknowledgement by passing in the parameter ",
 "--acknowledge-ceip in the command line.",
 "++++++++++++++++++++++++++++++++++++++++++++++++++++++++++++++"
 ]
 },
 "settings": {
 "ceip.enabled": true
 }
 }
}
Second, we will create the .JSON file to deploy the Secondary PSC, join the SSO domain and start replication.
psc02.JSON file
{
 "__version": "2.3.0",
 "__comments": "Sample template to deploy a Platform Services Controller appliance as a replication partner in an existing vCenter Single Sign-On domain on an ESXi host.",
 "new.vcsa": {
 "esxi": {
 "hostname": "192.168.105.12",
 "username": "root",
 "password": "Pass1234!",
 "deployment.network": "vspheremgmt",
 "datastore": "MGMT-DS-01"
 },
 "appliance": {
 "thin.disk.mode": true,
 "deployment.option": "infrastructure",
 "name": "psc02.cliffcahill.com"
 },
 "network": {
 "ip.family": "ipv4",
 "mode": "static",
 "ip": "192.168.105.212",
 "dns.servers": [
 "192.168.99.10"
 ],
 "prefix": "24",
 "gateway": "192.168.105.1",
 "system.name": "psc02.cliffcahill.com"
 },
 "os": {
 "password": "Pass1234!",
 "ssh.enable": false
 },
 "sso": {
 "password": "Pass1234!",
 "domain-name": "vsphere.local",
 "first-instance": false,
 "replication-partner-hostname": "psc01.cliffcahill.com",
 "sso.port": 443,
 "site-name": "SSO01"
 }
 },
 "ceip": {
 "description": {
 "__comments": [
 "++++VMware Customer Experience Improvement Program (CEIP)++++",
 "VMware's Customer Experience Improvement Program (CEIP) ",
 "provides VMware with information that enables VMware to ",
 "improve its products and services, to fix problems, ",
 "and to advise you on how best to deploy and use our ",
 "products. As part of CEIP, VMware collects technical ",
 "information about your organization's use of VMware ",
 "products and services on a regular basis in association ",
 "with your organization's VMware license key(s). This ",
 "information does not personally identify any individual. ",
 "",
 "Additional information regarding the data collected ",
 "through CEIP and the purposes for which it is used by ",
 "VMware is set forth in the Trust & Assurance Center at ",
 "http://www.vmware.com/trustvmware/ceip.html . If you ",
 "prefer not to participate in VMware's CEIP for this ",
 "product, you should disable CEIP by setting ",
 "'ceip.enabled': false. You may join or leave VMware's ",
 "CEIP for this product at any time. Please confirm your ",
 "acknowledgement by passing in the parameter ",
 "--acknowledge-ceip in the command line.",
 "++++++++++++++++++++++++++++++++++++++++++++++++++++++++++++++"
 ]
 },
 "settings": {
 "ceip.enabled": true
 }
 }
}
Thirdly we will create the .JSON file to deploy the VCSA and join the SSO domain.
vcsa.JSON file
NB. When I pulled the template from the current version of vSphere (VMware-vCenter-Server-Appliance-6.5.0.5500-5318154) ISO, The CIEP setting was missing from the template. The .JSON would not validate without it so I copied it from one of the similar template
{
    "__version": "2.3.0",
    "__comments": "Sample template to deploy a vCenter Server Appliance with an external Platform Services Controller on an ESXi host.",
    "new.vcsa": {
        "esxi": {
			"hostname": "192.168.105.12",
            "username": "root",
            "password": "Pass1234!",
            "deployment.network": "vspheremgmt",
            "datastore": "MGMT-DS-01"
        },
        "appliance": {
            "thin.disk.mode": true,
            "deployment.option": "management-medium",
            "name": "vcsa01.cliffcahill.com"
        },
        "network": {
          "ip.family": "ipv4",
            "mode": "static",
            "ip": "192.168.105.210",
            "dns.servers": [
                "192.168.99.10"
            ],
            "prefix": "24,
            "gateway": "192.168.105.1",
            "system.name": "vcsa01.cliffcahill.com"
        },
        "os": {
            "password": "Pass1234!",
            "ssh.enable": false
        },
        "sso": {
			"password":  "Pass1234!",
            "domain-name": "vsphere.local",
            "platform.services.controller": "psc01.cliffcahill.com",
            "sso.port": 443
        }
    },
	    "ceip": {
        "settings": {
            "ceip.enabled": false
        }
    }
}
I saved all these .json in a folder on my D:\ along with and install.PS1 file which we will write in a second.

Finally, we can construct a few lines of PowerShell that will utilize the ISO and the .JSON files to complete the install.
I added in a verify step which is very handy to check-over your .JSON files syntax. The first line of the .ps2 file is to set the location of vcsa-deploy.exe where z:\ is you CD Rom Drive.
cd Z:\vcsa-cli-installer\win32\
.\vcsa-deploy install --accept-eula --acknowledge-ceip --no-esx-ssl-verify --verify-only D:\VCSA\PSC01.json
.\vcsa-deploy install --accept-eula --acknowledge-ceip --no-esx-ssl-verify D:\VCSA\PSC01.json
.\vcsa-deploy install --accept-eula --acknowledge-ceip --no-esx-ssl-verify --verify-only D:\VCSA\PSC02.json
.\vcsa-deploy install --accept-eula --acknowledge-ceip --no-esx-ssl-verify D:\VCSA\PSC02.json
.\vcsa-deploy install --accept-eula --acknowledge-ceip --no-esx-ssl-verify --verify-only D:\VCSA\VCSA.json
.\vcsa-deploy install --accept-eula --acknowledge-ceip --no-esx-ssl-verify D:\VCSA\VCSA.json
PSC01 – Verify complete Deployment Complete and Installing Packages and starting services.

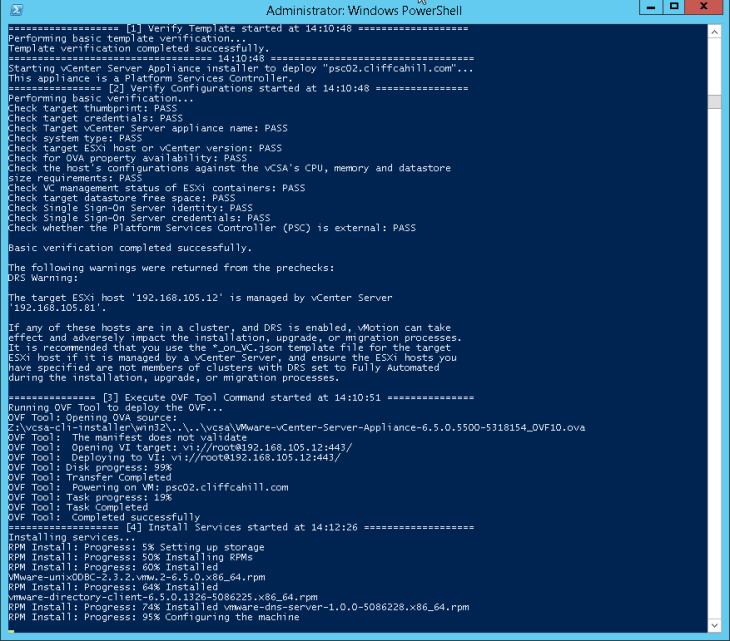
PSC02 – Verify complete Deployment Complete and Installing Packages and starting services.
VCSA01 – Verify complete Deployment Complete and Installing Packages and starting services.

View from the ESX Host post deployment.

Logging into my new VCSA

Easy !
